Home
ADA University
School of IT & Engineering
IEEE Activities
IEEE Computer Society Azerbaijan Chapter
IEEE AICT Conference CeDAWI Research Center
ADA University
School of IT & Engineering
IEEE Activities
IEEE Computer Society Azerbaijan Chapter
IEEE AICT Conference CeDAWI Research Center
Setting Up CDH Cloudera Distribution Hadoop Multi-Node Cluster. Step-by-Step Tutorial for Semi-Automated Installation.
I. PREPARATION OF VIRTUAL ENVIRONMENT
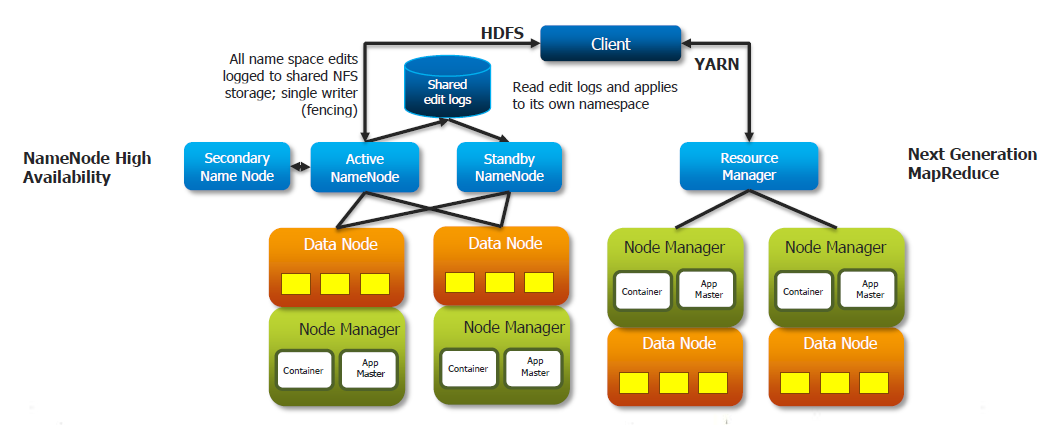
This tutorial is about building small Hadoop Cluster (Cloudera CDH 6 - Cloudera Distribution Hadoop) on pre-built Virtualbox Virtual Machines (VM). 5 VMs will be used, one for NameNode (Master) and 4 others for DataNodes (Workers). The 6th VM will be used as a Repository where installation packages of different Components. Using local repository will help to make installation process mush faster. It is also only way in case if Workers don't have Internet connection. Creation of 6 VMs, installation of OS and Network settings will require quite a lot of time and efforts. To make the process more effective, just one VM can be built and set anf after that it can be Cloned 5 times to have necessary number of VMs.While building clones make sure that all clones are Full Clones (not Linked Clone) and also chose setting Generate New MAC Addresses...
Virtual Machines:
- cluster-Node1 - 6GB/30GB VDI (dinamically allocated)
- cluster-Node2 - 5GB/30GB VDI (dinamically allocated)
- cluster-Node3 - 5GB/30GB VDI (dinamically allocated)
- cluster-Node4 - 5GB/30GB VDI (dinamically allocated)
- cluster-Node5 - 5GB/30GB VDI (dinamically allocated)
- cluster-Repo - 2GB/35GB VDI (dinamically allocated)
Host computer is Windows 10 and all Guests are Centos 7.7.
All steps will be implemented using root user. Root user's password is same for all Nodes for convenience. Install OS Centos 7.7.1908 x86 64 bit Minimal om each of VMs. Image for distribution is available at: Mirror server
II. PREPARATION OF PLATFORM
Hadoop Cluster may consist of from several to hundreds computers (nodes) those must be set in certain way and installed with special components and tools. This process may require a lot of time in order to implement all necessary steps sequntially on each node. In order to resolve this issue, in current tutorial multiple commands will run sequentially or parallely on remote Nodes performing non-interactive password-based authentication.SSHPASS utility - enables passing the password to SSH for authentication and avoid being asked to enter password interactively. Bash loop can be used to implement SSHPASS sequentially for each Node. In case if password-less authentication is set, we can use simply SSH.
PSSH utility - enable execution of commands in parallel on a number of remote Nodes through SSH connection. Since in our case after certain point of installation, we use password-less authentication, we will not pass password (otherwise key "-A" is required).
1. Update OS and install necessary utilities.
Since Cloudera Manager will be installed on NodeNode1 we start from this VM.
yum -y update && yum -y upgradefollowing command to enable EPEL repo on CentOS/RHEL server:
yum install epel-release

yum install python-pip
yum install pssh
yum install sshpass
yum install wget
root password is written into file located in root's home directory to allow SSHPASS to read password in non-interactive way from file:
echo "password" >> ./passw.txt
chmod 600 passw.txt
2. Configure Hostnames for all computers (Nodes) of Cluster
Edit /etc/hosts and add IP addresses and FQDNs of each Node192.168.56.110 node1.cluster.vm node1 192.168.56.111 node2.cluster.vm node2 192.168.56.112 node3.cluster.vm node3 192.168.56.113 node4.cluster.vm node4 192.168.56.114 node5.cluster.vm node5 192.168.56.115 repo.cluster.vm repoAdditionally, file "/root/hostName" with all FQDN (Fully Qualified Domain Name) of Nodes is created
echo -e "node1.cluster.vm\nnode2.cluster.vm\nnode3.cluster.vm\nnode4.cluster.vm\nnode5.cluster.vm" >> hostNames
3. Set hostnames of all remote Nodes using shell script and SSHPASS utility
cat /root/hostNames | while read HOSTNAME
do
   sshpass -f /root/passw.txt ssh -T root@${HOSTNAME} << EOF
      echo "==========================${HOSTNAME}"
      hostnamectl set-hostname ${HOSTNAME}
      echo "HOSTNAME=${HOSTNAME}" >> /etc/sysconfig/network
   EOF
done
Make sure that commands uname -a and hostname return same domain name
4. To introduce all Nodes to each other
This is optional step purposed to avoid being asked to approve fingerprint when connect to remote node the first time:
mkdir ~/.ssh
chmod 700 ~/.ssh

cat /root/hostNames | while read HOSTNAME
do
   echo "==========================${HOSTNAME}"
   ssh-keyscan ${HOSTNAME} >> ~/.ssh/known_hosts
done
To make known_hosts work for all users
cp ~/.ssh/known_hosts /etc/ssh/ssh_known_hostsCopy appropriate files to all Nodes
#!/bin/bash
cat /root/hostNames | while read HOSTNAME
do
   echo "==========================${HOSTNAME}"
   sshpass -f /root/passw.txt ssh -T root@${HOSTNAME} << EOF
      echo "==========================${HOSTNAME}"
      scp /etc/hosts/ root@${HOSTNAME}:/etc/hosts
      scp /etc/ssh/ssh_known_hosts root@${HOSTNAME}:/etc/ssh/ssh_known_hosts
   EOF
done
5. Set Password-less SSH authentication
In order to install Cloudera CDH using Cloudera Manager, we need to set password-less SSH access from master-node (node1) where Cloudera Manager server will be installed to all slave-nodes. To do so, we should generate RSA keys (private and public) using ssh-keygen utility with default settings for location pressing ENTER, leave empty password pressing ENTER two times.ssh-keygenor just use following command to do things in silent mode
ssh-keygen -f id_rsa -t rsa -N ""Following bash code will copy public key generated for master-node to all remote nodes adding the key to the
authorized_keys file on each node.
#!/bin/bash
cat /root/hostNames | while read HOSTNAME
do
   echo "==========================${HOSTNAME}"
   sshpass -f passw.txt ssh-copy-id root@${HOSTNAME}
done
6. Disable the Firewall
To desable firewall on all Nodes
cat /root/hostNames | while read HOSTNAME
do
   sshpass -f /root/passw.txt ssh -T root@${HOSTNAME} << EOF
      echo "==========================${HOSTNAME}"
      systemctl disable firewalld
      systemctl stop firewalld
   EOF
done
7. Setting SELinux mode
Security-Enhanced Linux (SELinux) should be changed topermissive
To check current state of SELinux the command getenforce can be used.NOTE: Because we set PasswordLess SSH authentication, now we can use simply SSH without need to use SSHPASS.
cat /root/hostNames | while read HOSTNAME
do
   ssh -T root@${HOSTNAME} << EOF
      echo "==========================${HOSTNAME}"
      sed -i 's/SELINUX=enforcing/SELINUX=permissive/g' /etc/selinux/config
      setenforce 0  #To enforce changes without rebooting
      getenforce
   EOF
done
8. Enable an NTP Service
To Install NTP server on each Node. This time we use PSSF utility to install packages in parallel.pssh --hosts hostNames -t 1000 --user root -i "yum install -y ntp;"To add/replace NTP servers in
/etc/ntp.conf config file on each Node
cat /root/hostNames | while read HOSTNAME
do
   ssh -T root@${HOSTNAME} << EOF
      echo "==========================${HOSTNAME}"
      sed -i '/^server/d' /etc/ntp.conf	# To remove existing servers in config file
      echo -e "server 0.pool.ntp.org\nserver 1.pool.ntp.org\nserver 2.pool.ntp.org" >> /etc/ntp.conf
   EOF
done
To enable NTP service on each Node
pssh --hosts hostNames -t 1000 --user root -i "systemctl start ntpd; systemctl enable ntpd; hwclock --systohc;"
9. Change max number of open files
use following commands to check appropriate value in your systemulimit -Sn ulimit -HnTo change values
pssh --hosts hostNames -t 1000 --user root -i "echo -e '* soft nofile 10000\n* hard nofile 10000\nroot soft nofile 10000\nroot hard nofile 10000\n' >> /etc/security/limits.conf"
10. Since some components in CDH 6 requires Python 2.7, make sure that all Nodes have it.
Use "python --version" to verify it or following command to check all nodespssh --hosts hostNames -t 1000 --user root -i "python --version;"
11. Install JDK
Cloudera recommends to install Oracle's JDK or OpenJava version 8. Since, Oracle requires authorisation for download, what can complicate the download process for many Nodes, we used another publicly available repository (repo.huaweicloud.com).
pssh --hosts hostNames -t 10000 --user root -i "curl -LO https://repo.huaweicloud.com/java/jdk/8u202-b08/jdk-8u202-linux-x64.rpm; rpm -Uvh jdk-8u202-linux-x64.rpm"Java Home Directory in our case is
/usr/java/jdk1.8.0_202-amd64/
III. INSTALLING CLOUDERA MANAGER AND CDH
1. Cloudera Manager Repository
Download thecloudera-manager.repo file for Centos 7 to the /etc/yum.repos.d/
wget https://archive.cloudera.com/cm6/6.3.1/redhat7/yum/cloudera-manager.repo -P /etc/yum.repos.d/
rpm --import https://archive.cloudera.com/cm6/6.3.1/redhat7/yum/RPM-GPG-KEY-cloudera
2. Configure Local Repository
It is recommended to build Local Repository especially in case of having number of Nodes more than 10 and if Nodes don't have access to Internet. Local Repository will be set on dedicated Node (repo.cluster.vm)
Installing Web server
yum install httpd

systemctl enable httpd

systemctl start httpd
To download the files for the latest Cloudera Manager 6.3 release
mkdir -p /var/www/html/cloudera-repos

wget --recursive --no-parent --no-host-directories https://archive.cloudera.com/cm6/6.3.1/redhat7/ -P /var/www/html/cloudera-repos
wget https://archive.cloudera.com/cm6/6.3.1/allkeys.asc -P /var/www/html/cloudera-repos/cm6/6.3.1/

chmod -R ugo+rX /var/www/html/cloudera-repos/cm6
To download the files for the latest CDH 6.3 (6.3.2) release
wget --recursive --no-parent --no-host-directories https://archive.cloudera.com/cdh6/6.3.2/redhat7/ -P /var/www/html/cloudera-repos
wget --recursive --no-parent --no-host-directories https://archive.cloudera.com/gplextras6/6.3.2/redhat7/ -P /var/www/html/cloudera-repos

chmod -R ugo+rX /var/www/html/cloudera-repos/cdh6
chmod -R ugo+rX /var/www/html/cloudera-repos/gplextras6
Apache Accumulo for CDH
wget --recursive --no-parent --no-host-directories https://archive.cloudera.com/accumulo-c5/redhat/ -P /var/www/html/cloudera-repos

chmod -R ugo+rX /var/www/html/cloudera-repos/accumulo-c5
Configuring Hosts to Use the Internal Repository
cat /root/hostNames | while read HOSTNAME
do
   ssh -T root@${HOSTNAME} << EOF
      echo "==========================${HOSTNAME}"
      rm -f /etc/yum.repos.d/cloudera-repo.repo
      echo -e "[cloudera-repo]\nname=cloudera-repo\nbaseurl=http://Repository.cluster.vm/cloudera-repos/cm6/6.3.1/redhat7/yum\nenabled=1\ngpgcheck=0\n" >> /etc/yum.repos.d/cloudera-repo.repo
   EOF
done
Now we can check the content of Local Repository through Web-browser on following address http://repo.cluster.vm
3. Configuring a Local Parcel Repository
Add or edit the line in section/etc/httpd/conf/httpd.conf) as following:
AddType application/x-gzip .gz .tgz .parcel
Restart HTTP server
systemctl restart httpd
wget --recursive --no-parent --no-host-directories https://archive.cloudera.com/cdh6/6.3.2/parcels/ -P /var/www/html/cloudera-repos
wget --recursive --no-parent --no-host-directories https://archive.cloudera.com/gplextras6/6.3.2/parcels/ -P /var/www/html/cloudera-repos

chmod -R ugo+rX /var/www/html/cloudera-repos/cdh6
chmod -R ugo+rX /var/www/html/cloudera-repos/gplextras6
Local Repository Address for parcels:
http://repo.cluster.vm/cloudera-repos/cdh6/6.3.2/parcels/
Apache Accumulo parcel for CDH
wget --recursive --no-parent --no-host-directories https://archive.cloudera.com/accumulo-c5/parcels/1.7.2/ -P /var/www/html/cloudera-repos

chmod -R ugo+rX /var/www/html/cloudera-repos/accumulo-c5
4. Install Cloudera Manager Server
yum install cloudera-manager-daemons cloudera-manager-agent cloudera-manager-server
5. Install and Configure Database for Cloudera Components
Cloudera Manager, CDH and other Components intensively using Database to store and read data. There are several alternative Database Management Systems supported by Cloudera: MariaDB, MySQL, PostgreSQL and Oracle. In this tutorial MariaDB will be used. Install MariaDByum install mariadb-serverConfigure MariaDB
systemctl stop mariadbUpdate/replace
/etc/my.cnf config file according to following
[mysqld]
datadir=/var/lib/mysql
socket=/var/lib/mysql/mysql.sock
transaction-isolation = READ-COMMITTED
# Disabling symbolic-links is recommended to prevent assorted security risks;
# to do so, uncomment this line:
symbolic-links = 0
# Settings user and group are ignored when systemd is used.
# If you need to run mysqld under a different user or group,
# customize your systemd unit file for mariadb according to the
# instructions in http://fedoraproject.org/wiki/Systemd

key_buffer = 16M
key_buffer_size = 32M
max_allowed_packet = 32M
thread_stack = 256K
thread_cache_size = 64
query_cache_limit = 8M
query_cache_size = 64M
query_cache_type = 1

max_connections = 550
#expire_logs_days = 10
#max_binlog_size = 100M

#log_bin should be on a disk with enough free space.
#Replace '/var/lib/mysql/mysql_binary_log' with an appropriate path for your
#system and chown the specified folder to the mysql user.
log_bin=/var/lib/mysql/mysql_binary_log

#In later versions of MariaDB, if you enable the binary log and do not set
#a server_id, MariaDB will not start. The server_id must be unique within
#the replicating group.
server_id=1

binlog_format = mixed

read_buffer_size = 2M
read_rnd_buffer_size = 16M
sort_buffer_size = 8M
join_buffer_size = 8M

# InnoDB settings
innodb_file_per_table = 1
innodb_flush_log_at_trx_commit  = 2
innodb_log_buffer_size = 64M
innodb_buffer_pool_size = 4G
innodb_thread_concurrency = 8
innodb_flush_method = O_DIRECT
innodb_log_file_size = 512M

[mysqld_safe]
log-error=/var/log/mariadb/mariadb.log
pid-file=/var/run/mariadb/mariadb.pid

#
# include all files from the config directory
#
!includedir /etc/my.cnf.d
Enable MariaDB as a service and start it
systemctl enable mariadb
systemctl start mariadb
Set the MariaDB root password and other settings as followings
/usr/bin/mysql_secure_installation

[...]
Enter current password for root (enter for none):
OK, successfully used password, moving on...
[...]
Set root password? [Y/n] Y
New password:
Re-enter new password:
[...]
Remove anonymous users? [Y/n] Y
[...]
Disallow root login remotely? [Y/n] N
[...]
Remove test database and access to it [Y/n] Y
[...]
Reload privilege tables now? [Y/n] Y
[...]
All done!  If you've completed all of the above steps, your MariaDB
installation should now be secure.
Thanks for using MariaDB!
Installing the JDBC Driver for MariaDB
wget https://dev.mysql.com/get/Downloads/Connector-J/mysql-connector-java-5.1.46.tar.gz
tar zxvf mysql-connector-java-5.1.46.tar.gz

mkdir -p /usr/share/java/
cd mysql-connector-java-5.1.46
cp mysql-connector-java-5.1.46-bin.jar /usr/share/java/mysql-connector-java.jar
6. Create Databases for Cloudera Components
Login to MariaDB on consolemysql -u root -pCreate following Databases for different Cloudera software conmonents. For simplicity all database users are assigned with same password
CREATE DATABASE scm DEFAULT CHARACTER SET utf8 DEFAULT COLLATE utf8_general_ci;
GRANT ALL ON scm.* TO 'scm'@'%' IDENTIFIED BY '*****';

CREATE DATABASE amon DEFAULT CHARACTER SET utf8 DEFAULT COLLATE utf8_general_ci;
GRANT ALL ON amon.* TO 'amon'@'%' IDENTIFIED BY '*****';

CREATE DATABASE rman DEFAULT CHARACTER SET utf8 DEFAULT COLLATE utf8_general_ci;
GRANT ALL ON rman.* TO 'rman'@'%' IDENTIFIED BY '*****';

CREATE DATABASE hue DEFAULT CHARACTER SET utf8 DEFAULT COLLATE utf8_general_ci;
GRANT ALL ON hue.* TO 'hue'@'%' IDENTIFIED BY '*****';

CREATE DATABASE metastore DEFAULT CHARACTER SET utf8 DEFAULT COLLATE utf8_general_ci;
GRANT ALL ON metastore.* TO 'hive'@'%' IDENTIFIED BY '*****';

CREATE DATABASE sentry DEFAULT CHARACTER SET utf8 DEFAULT COLLATE utf8_general_ci;
GRANT ALL ON sentry.* TO 'sentry'@'%' IDENTIFIED BY '*****';

CREATE DATABASE nav DEFAULT CHARACTER SET utf8 DEFAULT COLLATE utf8_general_ci;
GRANT ALL ON nav.* TO 'nav'@'%' IDENTIFIED BY '*****';

CREATE DATABASE navms DEFAULT CHARACTER SET utf8 DEFAULT COLLATE utf8_general_ci;
GRANT ALL ON navms.* TO 'navms'@'%' IDENTIFIED BY '*****';

CREATE DATABASE oozie DEFAULT CHARACTER SET utf8 DEFAULT COLLATE utf8_general_ci;
GRANT ALL ON oozie.* TO 'oozie'@'%' IDENTIFIED BY '*****';
7. Set up the Cloudera Manager Database
To set Database, we usescm_prepare_database.sh script with following parameters: databaseType, databaseName, databaseUser. Default DatabaseName and DatabaseUser for Cloudera Manager are scm and scm.
/opt/cloudera/cm/schema/scm_prepare_database.sh mysql scm scm
8. Install CDH and Other Software
Start Cloudera Manager Serversystemctl start cloudera-scm-serverTo observe the startup process
tail -f /var/log/cloudera-scm-server/cloudera-scm-server.logThe string
INFO WebServerImpl:com.cloudera.server.cmf.WebServerImpl: Started Jetty server is indicates that Cloudera Manager is started.
Now we can start Cloudera Manager Admin Console on browser using following address and port http://node1.cluster.vm:7180Log into Cloudera Manager Admin Console using default credentials:
Username: admin
Password: admin